How to Detail Your Travel Trailer Efficiently Step By Step
If you’re an RV or travel trailer owner, you already know how amazing it feels to hit the open road and explore new places. But after a few weeks (or months) of travel, even the most beloved home-on-wheels needs a little TLC! A thorough detailing session can make your RV look and feel brand new, preserve its value, and keep you feeling great on the road.
But where do you start? Detailing an RV is a bit different from cleaning your car or even your home. Between the specialized materials, unique shapes, and tight spaces, there’s a lot to consider! Luckily, I’m here to walk you through every step of the process—no missed spots, no wasted time.
Let’s get into it!
Why Detail Your RV in the First Place?
Before we get into the step-by-step how-to, let’s chat about why detailing your travel trailer or RV is so important:
✅ Protects your investment – RVs are expensive! Regular detailing keeps dirt, grime, and UV damage from wearing down your exterior and interior surfaces.
✅ Improves air quality – Dust, mold, and allergens build up quickly in an RV. Deep cleaning helps you breathe easier and feel more comfortable.
✅ Boosts resale value – A well-maintained RV can sell for thousands more when the time comes to upgrade.
✅ Enhances your comfort – Clean, polished spaces just feel better, especially when you’re out exploring.
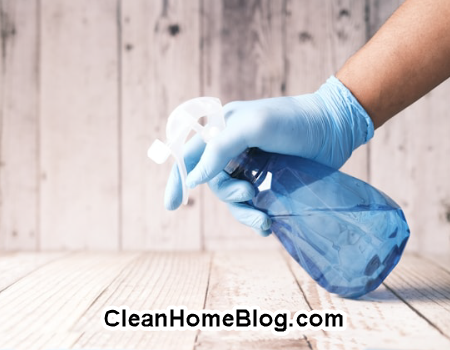
Essential Supplies for RV Detailing
Here’s what you’ll want to have on hand before getting started:
🪣 Buckets and a hose – For washing and rinsing.
🧽 Soft microfiber cloths and mitts – Gentle but effective on RV surfaces.
🧼 Mild, RV-friendly soap or wash-and-wax – Harsh detergents can damage the finish.
🧹 Soft-bristle brushes – Great for scrubbing textured surfaces.
🪞 Glass cleaner – For streak-free windows and mirrors.
🧴 Protectant sprays or waxes – To shield against UV rays and weather.
🪟 Vacuum or hand vac – Essential for cleaning carpets and tight corners.
🧽 All-purpose cleaner – For inside jobs.
🪑 Upholstery cleaner – Safe for seats and cushions.
✅ Optional: Roof cleaner, tire shine, bug & tar remover, and specialized cleaning agents for awnings, decals, and more.
Step-by-Step Guide to Detailing Your RV Efficiently
1. Organize and Declutter Your RV
Your RV should be well decluttered before the first soap bubble appears. Consider this stage to be the starting point for your detailing adventure. Start by getting rid of everything that is loose, including books, clothing, cookware, and even ornamental cushions. Take your time and carefully consider what should go in the RV and what may be left at home.
Make three special bins: “Donate,” “Go,” and “Stay.” This procedure will uncover a startlingly high number of things that you most likely won’t need while traveling. After everything has been cleared, clean the empty drawers, shelves, and compartments. Dust and crumbs can be eliminated from difficult-to-reach areas by using a portable vacuum.
Decluttering has the added benefit of immediately creating more space. Additionally, it helps you mentally get ready for the upcoming deep cleaning because there won’t be any more distractions from stray objects. Consider how you can rearrange each space (kitchen, bathroom, storage bays) to make the most of the available space.
Expert advice: maintain a record of everything that is put back into the RV. This guarantees you’re not carrying anything you don’t need and also aids with weight distribution, which is crucial for RV safety. An RV that is well-organized ultimately results in a more comfortable trip, fewer stress, and easier cleaning.
Did You Know Indoor Air Can Be Up To 8x More Polluted Than Outside? Air Purifiers Quietly Combat Dust, Allergens, And Toxins—Refreshing Your Space 24/7.
From Cooking Fumes To Pet Dander, They Trap What You Can’t See, Leaving Your Home Cleaner, Safer, And Noticeably Fresher. Breathe Better, Effortlessly.
Your Air Might Be Dirtier Than A City Sidewalk—Seriously! 😱 Indoor Air Can Be 8x More Polluted Than Outside. The Mighty Air Purifier!
💨 It Zaps Dust, Dander, And Stale Smells Like A Clean Freak On A Mission. 🍋✨ Breathe Like You Live In A Forest, Not A Funky Sock Drawer! 🌲👃

✅ Check It Out Here
2. Exterior Cleaning: Gloss From Head to Toe
After clearing the clutter, it’s time to focus on the outside of your RV, which is what people see first. To start, pick a shaded area to keep the soap from drying too soon. Using a hose, rinse the area from top to bottom to remove any loose debris or grime. This first rinse helps remove tough dirt and shows you where you need to concentrate your cleaning.
After that, fill a bucket with water and a light soap made especially for RVs. Steer clear of dish washes and aggressive detergents as they can harm decals or protective coatings. Work in parts with a big sponge or a soft-bristle brush with a long handle. Scrub the roof first, using circular, overlapping movements. Pay special attention to places like wheel wells and the bottom panels that are frequently hit by road debris.
Remember the roof! It requires a great deal of weather-related torture. For this task, use a different brush and a roof-friendly cleanser. Rinse well after cleaning every inch, making sure to get rid of any soap residue. The finish may get dulled and streaked with leftover suds.
Use microfiber towels to dry the RV as a last step. This keeps water stains at bay and gives your labor of love a glossy appearance. If you’re feeling very adventurous, add a layer of RV wax for extra shine and protection. Wax serves as a barrier against dirt and UV rays in addition to making cleaning easier in the future.
3. Mirrors and Windows: Stunning Views
Let’s face it, without shining windows and mirrors, no detail job is complete. To start, take out the screens, if you have any, and give them a quick rinse to get rid of dust and pests. To clean the screens and frames without damaging the mesh, use a mild soap solution.
Use a microfiber cloth and a streak-free glass cleaner on the windows themselves. To prevent overspray, spray the cleaner directly onto the cloth instead than the window. To achieve a streak-free shine, use vertical or horizontal strokes after initially wiping in a circular motion to break up the dirt.
Observe the window tracks and seals carefully. There, dirt and debris can build up and cause leaks and mechanical problems. Before wiping with a moist cloth, remove any accumulation using a soft brush or vacuum.
Mirrors are equally vital for beauty and safety. Use the same technique to clean them, being careful to remove any water stains or smudges that could obstruct your view. Remember that dust and condensation on the inside of windows, particularly the windshield, can have a surprisingly significant impact.
You’ll be astounded by how much lighter and cozier your RV feels both inside and out by the time you’re finished.
4. Roof Cleaning and Inspection
Don’t ignore your RV’s roof, which is its first line of protection from the weather. Start by using a strong ladder to safely ascend. Always exercise caution, and think about hiring an expert if you’re not sure you want to go up there.
First, sweep away any trash. If left unmanaged, pine needles, leaves, and even tiny branches can build up and result in mold or other harm. Gently clear them with a leaf blower or broom.
Next, use a cleaner made especially for the type of roof you have (metal, fiberglass, or rubber). Scrub any accumulated filth, mold, or mildew with a soft brush or mop. Because they are more likely to leak, pay close attention to seams and the region surrounding roof vents.
Make sure there is no cleaner residue left behind by giving it a thorough rinse. Watch for indications of damage as you work, such as worn spots or cracked sealant. By taking care of these problems now, you can avoid future expensive repairs.
To prolong the roof’s life and guard against sun damage, think about using a UV protectant once it has dried. In addition to looking fantastic, a clean, well-maintained roof guarantees a healthier RV inside.
5. Maintenance and Awning Care
Although your awning is essential for enjoying the outside, it is also vulnerable to mold growth and dirt accumulation. To get rid of surface grime, fully stretch it and give it a hose rinse. Use an awning-specific cleaner or a solution of mild soap and warm water if mildew is visible.
Scrub the awning’s two sides with a soft brush in light, uniform strokes. Abrasive brushes might harm the cloth, so stay away from using them. On stubborn stains, let the cleanser linger for a few minutes before giving it a good rinse.
After cleaning, let the awning air dry fully before pulling it back. If it is rolled up while wet, mildew and other smells may result. To assist repel water and UV rays, use a fabric protectant if at all possible.
Frequent awning cleaning prolongs the life of this useful feature and keeps your setup looking nice, allowing you to continue taking beautiful afternoon naps under the shade.
6. Thorough Cleaning of the Interior: Ceiling to Floor
Now that the outside of your RV is clean and clutter-free, it’s time to focus on the interior, which is where you’ll spend the most of your time. Your RV goes from “just clean” to “truly spotless” after this phase. Work your way down, starting at the top. Dust and cobwebs are drawn to overhead cabinets, light fixtures, and ceiling vents, which are frequently disregarded. Be careful not to harm any fixtures as you gently clean them with a damp cloth or microfiber duster.
Then concentrate on the walls. Use a gentle, non-abrasive cleanser to clean the surfaces. A soft magic eraser can be a lifesaver for any intractable stains or sticky areas (particularly if you have children or pets!). Keep in mind that filth likes to collect in those places that are frequently overlooked, such as closet corners or behind doors.
Let’s go on to the floors now. Use the proper cleaning supplies and equipment based on the type of flooring in your RV, such as vinyl, carpet, or laminate. A damp mop with a pH-neutral solution will leave laminate and vinyl floors shining without causing any damage to the finish. Vacuum all carpeted surfaces, being especially careful in high-traffic areas such as the main living area and foyer. Set-in odors and grime can be effectively removed with a steam cleaner or carpet cleaner, revitalizing worn-out fibers.
Bathrooms and kitchens also require extra attention. Use an all-purpose cleanser to clean the kitchen’s appliances, sink, and worktops. Remember the refrigerator and microwave! Remaining smells in these areas can be eliminated with a solution made of equal parts water and white vinegar. Use the proper disinfectants to clean the sink, toilet, and shower in the bathroom. For a streak-free finish, apply a mild glass cleaner or a vinegar-based solution on your glass or plastic shower door.
Drawers and cabinet interiors are also worthy of consideration. Before rearranging your belongings, wipe them clean with a moist towel and allow them to air dry fully. To minimize future chaos, now is the ideal time to make sure everything has a place.
Dust and hair can be removed off window coverings and upholstery with a lint roller or handheld vacuum. Follow the manufacturer’s directions for washing your window coverings or cushions if they can be machine washed. If not, they can be attractively refreshed by spot cleaning using an upholstery-safe solution.
Look for wear or damage that may require repair as you go through each area, such as loose cabinet handles, broken tiles, or leaking faucets. Resolving these minor problems now will prevent headaches later.
You’ll be astounded by how welcoming and new your RV seems by the time you’re finished. Every journey will be enjoyable with spotless surfaces, new fragrances, and a well-planned arrangement. Additionally, a clean inside contributes to your RV’s continued worth, which is always advantageous!
7. Cleaning Fixtures and Appliances
It’s time to focus on the fixtures and appliances that give your RV a homey sense after cleaning the main surfaces. These minor details truly add up to a high-end detail.
Begin in the kitchen. Small equipment, such as toasters and coffee machines, should be carefully removed and thoroughly cleaned. Before putting them back together, wash any detachable components with warm, soapy water and make sure they are totally dry. A little additional elbow grease is needed for the oven and stovetop; remove any residue with a degreasing cleaner. To scrub every surface, make sure to raise any detachable burner grates or covers.
Remove everything from the refrigerator and use a mild cleanser or a solution of vinegar and water to clean the shelves and drawers. Remember the door seals; spills and crumbs like to hide there. Before reinstalling anything, let everything to completely dry.
Mineral deposits or soap scum may accumulate on the bathroom sink and faucet. To get rid of buildup and bring back the shine, use a mild descaler or vinegar solution. To make stainless steel or chrome fixtures shine, use a gentle cloth to polish them.
You should also take care of your RV’s water system. For safe travel, you must clean your freshwater tank. To flush the system, use a diluted bleach solution or the sanitizing product that the manufacturer recommends. Rinse well to get rid of any residual taste or smell.
Don’t forget about fans and vents. Particularly if you have been camping in windy or dusty conditions, dust can accumulate rapidly. If at all possible, take off the vent covers and vacuum the dust and debris. The task can be completed with a quick wipe with a moist cloth.
Take a moment to test each appliance as you detail. Is the heating in the microwave uniform? Does the stove light up correctly? Is the water pump operating at maximum capacity? You can avoid unpleasant shocks on the road by recognizing and resolving any problems early.
The last flourish? Clean the air. Let some fresh air in by opening the windows. For a subtle, agreeable aroma, you can also use an essential oil diffuser or air freshener that is appropriate for RV usage. In addition to being immaculate, your RV will feel cozy and prepared for your upcoming journey.
8. Detailed Fabrics and Upholstery
The comfortable, welcoming elements of an RV’s interior are the upholstery and textiles, and they may elevate your living area from livable to opulent. In order to restore the softness and freshness of everything from your driver’s seat to your dinette cushions, this stage focuses on removing dust, debris, and tough stains.
First, take off any curtains, slipcovers, or detachable cushion covers. If they can be machine washed, use a mild detergent and a gentle cycle. Unless the care tag specifies otherwise, make careful to air-dry rather than tumble-dry because too much heat can cause materials to shrink or break.
A portable vacuum with a gentle brush attachment is your best friend when it comes to non-removable upholstery. Give every seat, backrest, and even the undersides of cushions a thorough vacuuming; dust and crumbs like to hide there! Particular attention should be paid to seams and wrinkles where dirt might collect.
Spot treat any stains that are apparent after that. Because some upholstery cleaners are made for synthetic materials and others are better for natural fibers, use one that is safe for the sort of fabric you have. To make sure there is no color fading or damage, always perform a patch test first in a discrete area. To remove the stain, gently apply the cleanser in circular motions using a sponge or soft cloth. After blotting with a fresh, moist towel to get rid of any residue, let it air dry fully.
To keep the surface of leather seats or accents soft and free of cracks, apply a leather cleaning and conditioner. Steer clear of strong chemicals that can remove the leather’s natural oils. For a polished appearance, use a gentle cloth to buff after cleaning.
To give a last touch of freshness after cleaning the upholstery and materials, think about applying a fabric refresher spray. To eliminate overpowering smells that can linger in a tiny space, look for solutions made especially for RVs or cars.
Remember about carpets and rugs! To get rid of ingrained dirt, move your small area rugs outside and give them a good shake. Your floor coverings can be given new vitality and color with a thorough vacuuming or even a light shampooing.
Launder all linen, including blankets, pillowcases, mattress protectors, and sheets, after stripping beds in the sleeping areas. Before vacuuming, sprinkle baking soda on any foam mattresses or cushions in your RV and leave it for at least fifteen minutes. This gets rid of smells and makes them smell better for your next trip.
To make things appear welcoming and comfortable, take a moment to fluff and re-fluff cushions as you finish this step. An RV’s inside that is tidy and smells good immediately conveys a feeling of coziness and relaxation.
Detailing the fabrics and upholstery of your RV not only increases comfort but also increases the longevity of these plush pieces. Wear and tear can result from fibers being broken down over time by dirt and filth. You’ll keep these regions feeling and looking their finest for many years of future experiences if you give them special care!
9. Cleaning and Sanitizing
Maintaining cleanliness in an RV is important for both health and safety reasons, not simply aesthetics. By making sure that every surface is cleaned and sterilized, this step elevates your detailing and creates a secure environment for both you and your passengers.
Start by focusing on high-touch regions. Consider light switches, seatbelt buckles, cabinet handles, doorknobs, and any control panels. To properly clean these surfaces, use a microfiber cloth and a cleaning wipe or spray disinfectant. To make sure the product destroys bacteria and germs, let it sit for the suggested amount of time.
Sanitation in the kitchen and bathroom is very crucial. Clean the kitchen’s cabinet pulls, sink handles, and surfaces. Pay attention to the shower knobs, faucet handles, and, of course, the toilet in the bathroom. These areas are ideal for an RV-safe disinfecting spray; just make sure the spray is compatible with your surfaces.
When handling disinfectants, make sure to thoroughly read the label and, if necessary, wear gloves. In order to maintain enough ventilation, open windows or turn on vent fans. To avoid dangerous fumes, do not combine bleach-based solutions with other cleaning agents.
Use a fabric-specific disinfection spray on soft surfaces, such as beds and upholstery. These products are effective at eliminating germs without causing harm to delicate textiles. If you’re not sure how your fabrics will respond, try a patch test once more.
Another crucial component of this procedure is sanitizing your water system. Use a weak bleach solution or an RV-safe sanitizer to flush and sterilize the freshwater system if you haven’t already. Rinse well to remove any remaining disinfectant; this procedure keeps your drinking water safe and pure.
Last but not least, remember your heating and cooling system. The quality of the air can be impacted by dust and allergies building up in the ducts. Vacuum away any visible dust from the vents and replace the air filters if necessary.
Frequent cleaning and disinfection are crucial for RV health all year long, not just during a worldwide epidemic. Warm, humid conditions are ideal for the growth of mold, mildew, and bacteria, so routine cleaning will keep your RV smelling and feeling good.
After completing this process, you will be able to travel wherever the road takes you and your loved ones with the assurance that your RV is not only clean but also genuinely safe.
10. Final Check and Adjustments
Your RV is almost ready to go, but before you declare it finished, you should do a last check to make sure nothing has been overlooked and that every part of your mobile home is in perfect condition.
Take a leisurely tour of the interior and exterior first. Take a notepad with you so you may record any last-minute chores or touch-ups you come across. Look for minor elements that may require care, such as a scuff mark next to the door, a missed location on the exterior, or a speck on a mirror.
To look for dust or remaining cleaning residue, open all of the cupboards and drawers inside. To avoid mold or mildew, make sure everything is completely dry. Appliances should be retested to ensure they are operating flawlessly. Check for leaks in the kitchen and bathroom faucets and drains; occasionally, a thorough cleaning makes them easier to find.
For one last look outside, go outside. Look for water stains, streaks, or missed soap residue. A quick wipe with a fresh microfiber cloth will take care of any that you see. To make sure you didn’t overlook any leaves or twigs that can cause long-term problems, take another look at the roof of your RV.
Nothing is more pleasant than watching your freshly detailed RV glitter, so think about snapping a few pictures! Sharing these “after” pictures with loved ones who like watching your RV excursions is also a fun way to compare them later.
Setting the stage for your next vacation is the last phase. Using the inventory list you made during the decluttering process, restock your RV with the necessities. Stow away goods you use less regularly and keep items you use frequently close at hand. The idea is to keep the sense of being newly detailed as long as possible.
Add a few personal touches, like your favorite coffee mug beside the kitchen sink, a vase of fresh flowers, or a nice throw blanket, if you have the time. Your RV feels more like home with these minor upgrades.
Finally, inhale deeply and savor the results of your labor. Although detailing an RV requires time and work, the rewards are enormous: a shiny, odor-free room that is ready for exploration. Your RV is now a tidy, cozy retreat ready to create memories, whether you’re traveling tomorrow or next month!
Quick Overview Of Steps To Detailing and Cleaning Your RV