
How To Clean Gas Stove Top Grates, Burners & Surface
Let’s Be Truthful
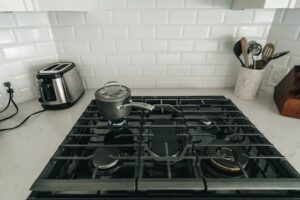
Nobody likes to clean the stovetop.
It’s one of those chores that you can’t help but notice every time you enter the kitchen:
the burnt-on rings of last night’s “just-one-more-minute” pasta sauce,
the dingy coating of grease,
and the subtle scent of something that might have once been edible.
I understand.
The same thing used to happen to me; I would swear to myself that I would do it “tomorrow” until the kitchen was filled with that subtle, stale cooking odor that persisted like shame.
A Shift in Mindset
However, I made the decision to quit delaying it one weekend.
And believe me when I say that cleaning your gas stovetop properly is strangely gratifying, almost meditative—
like clearing the mess out of your kitchen.
The best part is that when you’ve done the deep clean, maintaining its cleanliness is simple.
Let’s Get Started
Well, let’s get started.
In addition to sharing the one secret that makes your kitchen smell as fresh as a mountain chalet (hint: it hums quietly and loves clean air),
I’ll walk you through a step-by-step process that will make your gas stove appear brand new without the use of harsh chemicals.
🧴 What You’ll Need
Before you dive in, gather your cleaning army. Having your tools ready saves time and frustration.
| Item | Purpose |
|---|---|
| Baking soda | Natural degreaser and scrubber |
| White vinegar | Cuts grease, disinfects, removes odor |
| Dish soap | Breaks down oil and food residue |
| Warm water | The universal cleaning base |
| Non-abrasive sponge | Gentle yet effective |
| Microfiber cloth | Streak-free drying and polishing |
| Toothbrush or small scrub brush | Reaches tiny crevices around burners |
| Paper towels | For drying and final wipe |
| Optional: Lemon or essential oil | Adds freshness and breaks down buildup |
Step 1: Switch Off, Let the Deck Cool, Then Clear It
First and foremost, safety comes first.
Make sure the gas is off and the stove is absolutely cool.
If at all feasible, remove the knobs, burner caps, and grates.
Prepare yourself if you haven’t done this in a long time since you may discover fossilized spaghetti sauce or items that appear to have withstood a meteor strike.
It’s all right. We’ll take care of it.
Step 2: Let the Disposables Soak
Place your burner tops and grates in the sink (or a large basin if your grates are large).
Pour in a generous amount of vinegar and warm, soapy water.
As you work on the main surface, let them soak for 15 to 20 minutes.
💡 Expert Advice: For further degreasing strength, mix with a spoonful of baking soda.
There will be a pleasing buzz as science works.
Step 3: Clean the Surface
In a small bowl, combine this:
-
One cup of warm water
-
Half a cup of white vinegar
-
One teaspoon of dish soap
Scrub the stovetop gently with your sponge after dipping it in.
You’ll feel the dirt come off; the shiny, sticky layer is primarily made up of oil and food residue that has evaporated.
Before washing again, sprinkle a little amount of baking soda directly on any difficult areas, spritz with your vinegar mixture, and let it bubble for a few minutes.
Why This Is Effective
Because baking soda is somewhat alkaline, it dissolves acidic, carbonized debris without causing surface scratches.
Because it is acidic, vinegar dissolves minerals and grease.
They are a cleaning power pair together.
Step 4: Remember the Little Things
Clean the area around the burner knobs and heads with a toothbrush or tiny scrub brush.
Grease loves to get trapped in these cracks.
If your burner heads are clogged, take them out (first consult your handbook!) and use a straightened paper clip to poke tiny gas holes in them.
Never use anything that could break off inside, such toothpicks.
Step 5: Clean and Pat Dry
To get rid of any remaining soap or baking soda, wipe everything off with a fresh, moist microfiber towel.
Then, for that showroom sheen, rub it over again with a dry microfiber cloth.
✨ Optional: Mist your stovetop by combining a few drops of lemon essential oil with water in a spray bottle.
It murmurs, “This kitchen is cared for,” with its subtle citrusy aroma.
Step 6: Clean the Burner Caps and Grates
Your grates and caps should be soaking well by now.
Use a sponge that isn’t too rough to gently scrub them.
For extremely tough residue, apply a paste made with baking soda and water to the soiled areas, leave it there for ten minutes, and then scrub.
Rinse them well and allow them to air dry fully.
If you’re impatient like me, you can also use a towel to dry them.
Reassemble everything after it has dried.
Step 7: The Air Itself — The Final Touch
After cleaning, you’ve wet, wiped, and polished.
The stove looks amazing.
However, it’s not your fault if your kitchen still has a slight fragrance similar to burnt bacon or last week’s stir-fry.
The air is to blame for that.
Your air purifier is the unsung hero in this situation.
🌬️ The Importance of Air Purifiers in Every Kitchen
Consider this: tiny particles such as smoke, grease aerosols, volatile organic compounds (VOCs), and residual smells permeate your kitchen every time you cook.
Your range hood does not catch them all.
These particles cling to draperies, land on your counters, and into the air you breathe.
Activated carbon and HEPA filters in an air purifier silently suck up:
-
Cleaning and cooking product odors
-
The smoke from frying or searing
-
Tiny fragments from the burning of gas
-
Dust, allergies, and pet dander
The outcome? A kitchen that does more than just appear clean; it feels fresh.
Bonus: Avoid Grease Buildup in the Future
A pound of elbow grease is indeed worth an ounce of prevention.
Try these simple routines:
-
Spills should be cleaned up right away since heat cements them.
-
Weekly quick clean: A 5-minute wipe is preferable to a thorough scrape.
-
Lemon slices in a saucepan of boiling water make a natural deodorizer that also removes residue.
-
Keep a cloth made of microfibre close by: After every meal, a quick sweep keeps everything pristine.
-
Every day, use your air purifier to prevent the accumulation of tiny grease particles and odors.
Typical Errors in Stove Cleaning (and How to Avoid Them)
-
Using aggressive abrasives or steel wool can harm stainless steel and enamel.
-
Ignoring the need to rinse well: Dirt is drawn to residue.
-
Reassembling when wet: To avoid rust, always dry everything.
-
Disregarding the knobs: They attract germs! Every week, take them out and clean them.
-
Ignoring air quality: No matter how much cleaning you do, your house will never feel completely clean if the air isn’t clean.
The Mindset of the Clean Kitchen 🧘♀️
A clean stove has a profoundly psychological effect.
It’s similar to wrapping up your day.
Now that you’ve cleaned, fed, and cooked, your kitchen is bustling with peaceful order.
Additionally, cleaner surroundings lower stress and increase focus, which is supported by science.
Additionally, it feels as though your house is returning something to you when the air is clean and you can actually smell it.
The Unseen Disarray You Were Unaware That You Had
The air in your kitchen is dirtier than the counters, which is a fact that most people overlook.
Releases of cooking:
-
Gas flames’ nitrogen dioxide (NO₂)
-
Small clumps of oil that stick to walls
-
Smoke stains that seep into textiles
-
VOCs (volatile organic compounds) from detergents, sprays, and non-stick cookware
That cannot be cleaned with a sponge.
However, it can be neutralized by using clean airflow.
This is why a sleek, silent air purifier sits in the middle of my kitchen (and house) and works around the clock to remove dust, smells, and pollutants from the air like a silent guardian.
It’s not glitzy. It doesn’t “glow.”
The distinction between a kitchen that appears clean and one that feels healthy, however, is this.
🧹 Fast Review Checklist
✅ Switch off and let your stove cool. Grates, burner caps, and knobs should be taken out and soaked.
✅ Use a vinegar and dish soap mixture to scrub the surface.
✅ Apply baking soda paste to areas that won’t go away.
✅ Use a microfiber towel to rinse and dry.
✅ Reassemble and take in your craftsmanship.
✅ Turn on your air purifier to get rid of any residual smells.
Concluding Remarks
Cleaning your gas stove top is more than a chore — it’s a ritual.
It’s a statement that your kitchen is worthy of maintenance.
Furthermore, although the gleam of a clean stove is pleasing, the true benefit is in the invisible, fresh cleanliness that comes from pure air.
Clean surfaces are only half the story, so keep that in mind the next time you handle that oily mess.
The secret component is clean air.
Your home, your lungs, and your stove will all appreciate it.